The words “roof leak” are ones that no home owner wants to hear. Will you have to replace the whole roof? Call a professional? Can you do any of it yourself?
If you have water stains that run down walls or go across the ceilings of your house, the most likely cause is a leaking roof. Even if you are planning on getting a new roof soon or the leak is minor, it’s still a good idea to fix a leaky roof immediately. Small leaks can become big problems in a short amount of time leading to ruined insulation, rotted wood framing, black mold and damaged drywall on walls and ceilings.
Believe it or not, tracking down the source of the leak is sometimes harder than the repair itself. Water tends to travel and often the damage may take place far from the source, making the initial cause of the roof leak hard to trace. Be prepared to do some work before actually tackling the problem.
HOW TO FIND A ROOF LEAK
Finding a Leak From Inside Your Home
When you’re trying to track down a leak, the first place to start is the attic. While it may seem counter-intuitive to start at the inside of your house, the lack of shingles

can make actually make it easier to spot any problems. Use a flashlight to examine the underside of the roof. Check for any signs of light coming through the plywood to find any holes. Also see if there are any areas on the underside that are darker than others. If it hasn’t rained or snowed lately, these dark areas may not be easy to spot. If you notice areas of black mold, however, it’s likely that this is where your roof has a leak. Mold thrives on moisture.
If the roof underside has insulation, it can actually help you spot a leak. Insulation on leaky roofs will usually show noticeable damage or deterioration. Using the appropriate protective gear, be sure not just to remove the damaged insulation, but the insulation next to it. This will allow you to follow the path of the water to the actual entry point, which may be further away.
In some cases, a leak can be caused by something as small as a roofing nail. Sometimes a roofing nail will not embed in a rafter like it is supposed to be, but will protrude into the attic. Water or frost can easily effect this nail and eventually cause a leak.
Still having trouble locating the source of your leaking roof? With the help of a friend, use a garden hose to try to discover the leak’s source. One of you goes up on the roof and the other stays in the attic to see if they can spot any leakage.
Start with the area where the leak seems to be coming from. Go over the roof section by section. Be patient and let the hose run for several minutes in one area. This process may take some time, but will be worth it once you isolate the problem. Once y
ou locate the leak, push a nail, straw or toothpick through the hole so you can locate it again when you are on the roof. You can also have the person on the roof use duct tape or chalk to mark the surface of the roof.
Finding a Leak on Your Rooftop
One of the most common causes of leaks are anything that projects through the roof—plumbing and chimney vents, exhaust flues, skylights and dormers are common culprits. Over time, the flashing and other seals around these items can weaken, come loose or erode allowing rain and snow to seep in. Roof leaks can be caused by more obvious signs as well, such as missing or aging shingles, holes, crumbling chimneys or clogged gutters.
Examining Roof Flashing
Flashing is a thin strip of metal that is used over the joints in the roof to prevent water and snow from seeping in and causing damage. Flashing will vary depending on what type and style of roof that you have, but is commonly installed around chimneys, skylights, pipes and dormer windows. It is also installed in the “valleys” of the roof and where any part of the roof meets a wall.
Flashing needs to not only be installed during the roofing process, but properly sealed as well. Over the years, this metal—as it’s sealant—can come loose, weather, or develop cracks.
Plumbing and Roof Vent Boots
Boots and vents work in conjunction with flashings in creating a waterproof barrier. They are usually plastic, rubber or metal—rubber being the most common material used in newer built homes. Boots and vents are prefabricated to slip over things like pipes or air vents. You may also hear them referred to as collars.
To see if these items are the source of your leak, examine plastic and rubber boots and vents for cracks and metal ones for broken seams. Rubber and plastic boots and vents often rot away or tear from age or bad weather, while metal ones tend to corrode or rust. Check to see if there are pulled, missing or loose nails around the base or where it attaches to the roof
Checking Chimneys
While brick and stone chimneys may seem indestructible, the mortar the binds those

stones or bricks together can erode and crumble over time. Make sure to inspect the mortared joints where the chimney enters the roof, as well as the mud cap on top of the chimney for deterioration.
Asphalt Shingles
The majority of residential homes are covered in asphalt shingles, which over the years lose moisture and protective coatings, causing them to curl, crack or disintegrate. Contraction and expansion caused by changes in weather as well as years of the sun’s harsh rays can damage the materials that hold asphalt shingles together.
Roof shingles hold up much better when you are proactive in maintaining them. Preserving your roof’s shingles can add to the life of your roof as well as make it last longer.
Holes
Even the tiniest of holes can cause a roof to leak. Holes from weather damage are obvious, but holes are often caused by misplaced roofing nails or antenna or satellite mounting brackets. Remember to mark any holes you find in case there is more than one or you can’t get to them immediately. It will make things easier once you go to patch a roof leak.
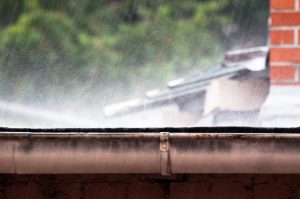
Inspecting Gutters
Many people still live in houses that do not have capped or covered gutters. Gutters are often an overlooked cause of leaks, and may even cause basements to flood. Older and open gutters can get clogged with debris like leaves, branches or tree needles, not to mention birds finding them an easy place to build their nests. Gummed up gutters impede rainwater and melting snow from traveling away from your roof and foundation.
Another common cause is upper roof gutters draining into a lower roof. This can cause the lower roof to become over-saturated, causing leaks. Make sure the downspout on your house goes to another gutter or down to the ground.
If you live in a part of the country that regularly gets snow, ice dams are another problem seen on house roofs and their gutters. Ice dams are caused by a combination of melting snow—due to weather changes or the heat from your house—refreezing and turning into ice at the edge of your roofline. If the ice dam or snow isn’t removed, it can prevent water from any melting snow or ice to properly drain from your roof. This can cause the water to back up underneath roof shingles and find its way into your house. Without proper roof snow removal, the ice that develops may grow large enough to prevent water from melting snow from properly draining off the roof. When the water is unable to drain from the roof, it may then seep underneath roof shingles and make its way into your home.
Are Your Skylights Leaking?
Skylights are a popular way of adding to the appeal of your house. They can let light into dark spaces and make smaller rooms look bigger. The rubber seal around the skylight glass can dry out and crack, thereby making the skylight vulnerable to leaks. Like other items on your roof, check for cracks or tears in the flashing around the top and sides of the skylight. One of the biggest causes of skylight leaks is improper

installation. Skylights that are poorly fitted or installed without proper pitch may be fine for a while, but eventually they are almost guaranteed to develop leaks.
Checking Walls and Dormers
A dormer is a roofed structure—usually containing a window—that projects from a sloping roof or face of an outside wall. Like any roof, Dormers have the different roofing styles and varieties. Dormer windows, along with corner boards and siding provide several areas where water can enter the interior of a house. Old, missing or cracked caulk between window edges, corner boards and siding are often culprits. Even if the flashing is fine, water can penetrate these areas, work its way behind the flashing and into your house. Caulk around these areas may look intact, but over time may not be sealing like it once did.
DIY ROOF REPAIR: IS IT RIGHT FOR YOU?
Once you have found the source of your leak, you should act as soon as possible to fix the leak—leaks usually only get worse. If you don’t feel comfortable on the roof or if the leak seems extensive, don’t hesitate to contact an expert. Some repairs should only be made by professionals, while others can be done by those with intermediate DIY skills.
Prepare to Repair
Before you tackle any roof repairs, it’s always a good idea to have your tools and materials ready beforehand. This will prevent any frustration or last minute trips to the hardware store. Here’s a list of recommended tools and materials to have before starting any roof repairs. The materials may vary depending on what your roof needs.
Here are some tools you’ll find useful:
- Drill (preferably cordless)
- Hammer
- Pry bar
- Caulk gun and roofing sealant
- Putty knife
- Tin snips
Flashing, Plumbing Boots & Roof Vents
Repairing these items on your roof can range from easy to difficult depending on the severity and location of the leak. If you feel you have the experience to d

o a DIY roof repair, you can purchase common flashing pieces, boots and collars at your local home repair store.
Roof Flashing Repair
If you are fixing flashing, pry up the nails used to secure it once you locate the source of the leak. Lift any shingles out of the way (be careful not to damage them) and remove the damaged piece. Replacing flashing may mean removing several rows of singles as well as the old flashing. If you don’t have extra shingles be careful during the removal process so you can use them again.
Put the new flashing in its place and fasten it with roofing nails using the pattern of your old piece. Apply a coating of roofing sealant to the nail heads to make them even more weather-resistant. If the damaged flashing is over a vent or pipe, you will want to replace the collar or boot as well.
Depending on the size of the job, replacing flashing and/or other barrier pieces usually costs a few hundred dollars. Although you may be tempted to just reseal the existing flashing using caulking or roof cement, this solution to your leaky roof will not last as long as replacing the flashing. You should only do this if you are planning on replacing the roof soon.
If the flashing around your chimney has minor damage you should be able to replace it as well, but if the chimney mortar is also deteriorating, you will probably want to hire a professional
Replacing Roof Vent Boots
Most of the time, you can replace the roof vent boot or collar by removing the nails on the shingles surrounding the boot or collar. You may be able to work some of the nails loose using a crowbar or hammer claw without removing shingles. After installing the new collar or boot but before re-nailing the shingles on to the roof, put a

few drops of roofing sealant caulk beneath the shingles surrounding the boot or collar to help add a water barrier.
Repairing or Replacing Skylights
Fixing or replacing leaking skylights is usually best left to professionals. If the rubber seal around the skylight is dried out or coming off, a high quality caulk can be applied, but will only be a temporary fix. To replace shingles and flashing around a skylight will usually run a minimum of $400. Completely replacing a leaky or poorly installed skylight averages $1000 or more. The cost of both repairing or replacing a skylight will depend on the number of stories the house has, roof slope, the type of skylight and how much labor is required.
Repairing Walls and Dormers
If the problem with walls and dormers is caulk, simply dig out any old caulk with a putty knife and replace it with silicone latex caulk. If you find cracked, rotted or missing siding, replace it with a new piece. Siding directly next to flashing should overlap it by at least two inches. If there is any overlapping flashing at the corners where walls, dormers and roof meet, double check to see if the caulk is in good condition. If not, replace it with new caulk as well.
Replacing Shingles
If you find a shingle or two in your yard, there is an increased chance that water from the next rain or snowstorm could get into your house, causing a leaky roof. A few missing shingles aren’t hard to replace. If the originals are in good shape, you can reuse them, but it is preferable to use new or leftover shingles. Remember that since these shingles haven’t been out in the sun and weather, they are likely not going to match the rest of your roof.
Don’t forget to replace the nails as well! Remove the first row of nails by putting a pry bar under the shingle immediately above the damaged one and gently lifting it. You’ll see the first row of nails beneath. Remove the second row the same way. You can then slide the new shingle into place a secure with roofing nails.
Patching a Leaky Roof
It may be tempting to dab some caulk on any small holes you may find on your roof and call it a day. Since water has already come into your house through this hole, it is

best to gently pry up the shingle and put a piece of flashing underneath it and on top of the hole. Use the caulk to seal the flashing to the hole. Any large holes or those that have caused any structural damage need inspected by a professional roofer.
Roof Leaks Around Chimneys
Brick and stone chimneys that have crumbling or eroding mortar—especially at the joints where the chimney enters the roof—are best done by a professional. A chimney in very bad condition, may even have to be “rebuilt.” After any repairs are made to your chimney, it should then be coated with a waterproof sealant.
Fixing Gutters
The gutters on your house are one of the easiest things to fix. You can often just grab a ladder and some thick gardening gloves and go to work pulling out the debris causing clogs. If you don’t feel comfortable on a ladder or don’t enjoy messy work, professional gutter cleaning services are also available. Trimming overhanging tree branches throughout the year will also help keep your gutters clean and roof free of debris.
Ice dams can be prevented by keeping the edges of your roof clear using an ice melting product or roof rake. Some gutter and roof companies offer gutters with built-in ice melting systems or can install roof edge heating cables. Although not expensive, they will raise your utility bill since these systems require electricity to operate.
Roof Dormers
Use a putty knife and check areas where walls, dormers and siding intersect with the roof. Dig out any caulk that looks damaged or seems to no longer be working. Replace the old caulk with silicone latex caulk. Be sure to examine the siding above any flashing. Check for cracks, rot or any missing siding pieces. If you are still having trouble isolating the leak, the flashing located at any overlapping corners may be to blame. Due to wear and tear, there is often hardening and crumbling caulk where pieces overlap at the inside corner. If the leak has caused the wood around a dormer or its window to rot, you will want to contact a contractor.
Conclusion
Conduct a yearly roof inspection during the summer and spring. Make it a habit to reseal around any plumbing and chimney pipes, vents and any other objects installed on the roof like a satellite dish. Check flashings and chimney mortar as well.
You’ll find that doing preventative maintenance will not only reduce the likelihood of a leaky roof, but also will make your roof last longer.


